In order to produce a battery of breeding, you will need the following hardware.
a-6 pieces of wood of form 4 X 4 cms and 2 meters long for the reinforcement;
b- 6 boards of wood of 1 cm thickness of form 50 X 50 cms for the grounds of the cages (stages of the battery);
c- 2 boards of 3 cms thickness, one meter by 40 cms for the top and the lower part of the battery;
d- 2 boards of 1 cm thickness, 2 meters by 50 cms for the back of the cages;
e- 1 board of 1 cm thickness, 2 meters by 40 cm for the partition enters the two sides of the battery;
f- 6 wood bars of 2 X 2 cms by 2 meters length for the reinforcement of the frontage of the cages;
g- boards of 5 mms thickness for drawers and gates.
h- screws, wood stick, ankles with wood, 24 squares of chair, screw hinges, pilot wheels and all tools necessary to cutting, drilling…
Realization :
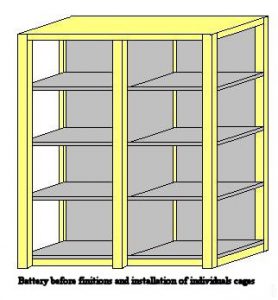
This is the starting box to be realized.
At first, put the board of the lower part of the battery (3cms X 1 m X 40 cms) on the ground, fix on the four corners at the ankles assistance at wood (6 per corner). Four of the six pieces of wood (4 X 4 cms X 2 m) vertically in order to constitute to it tower of the battery. Fix then in a central way over the length and in the same way the two other pieces of wood.
Once this operation carried out. Insert between the two central stakes the board of 1 cm thickness (2 meters X 40 cms). And fix it on the ground of the battery. Using ankles at wood (put in approximately 5 or 6). Once this board inserted, cut the latter 3 cms below the top of the two vertical stakes. In order to fix the top of the battery in the same way that the ground.
Once the 6 stakes make
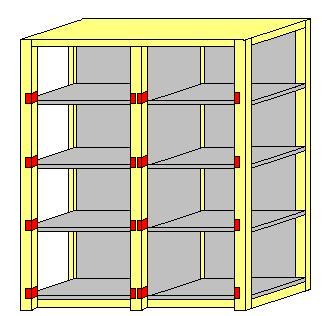
Once the 6 stakes vertical. The central board, the top and the lower part of the battery assembled together. It any more but does not remain you to put the racks to make the ground of the cages. You will fix using 4 squares at chair and of screw each shelf at the heights following: 48 cms for the first stage. 96.5 cms for the second and 1 m 45 cms for the third. Previously you will have made notches of 4 by 4 cms for the side external and of 2 by 4 cms for the central side. On the front of the shelves in order to encrust them in the stakes with the reinforcement. Once all the put shelves, it is now necessary to carry out the installation of each cage. The following stages are thus to repeat 8 times.
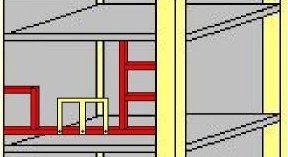
You will have first of all to create red reinforcement you can see after. Using the bars of 2 X 2 cms to fix the various elements of the cage. Thus cut out a piece of 44 cms from length for the horizontal bar. Two pieces of 12 and 14 cms for the gate (on the left). A piece of 42 cms for the vertical line bar and 2 piece of 12 cms for the gate nid/baignoire (interior of the gate nest of 12 by 12 cms) fixed at the vertical bar. Assemble just like the following image using ankles with wood. And to attach the whole to the face before each cage. Space between the horizontal bar and the ground of each cage will be filled by the drawer.
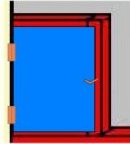
Second step :
You will fix then in the following way a gate made up of a small plank 13 X 13 cms using two small hinges. And of a hinge at screw to close it. For the hinges, my consulting is to take a long hinge of piano of 1 or 2 meters which you will cut in small hinges. This being much less expensive than several small individual hinges.
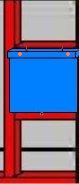
Third step :
For the nest carrier (located cage on the right). You will previously fix a small bar (blue on the diagram) of 2 X 2cms by 14 cms length on the high bar of the red framework carried out using 2 screws. You will bore two small holes in order to let pass the two small nails being used as fixing with the gate. Made up of a small plank of 14 X 13 cms and fixed by a screw of supports in bottom which you will put out with each removal of the gate.
Fourth step :
Following comes the framework to put the mangers. Take a small plank of 5 mms thickness and 8.5 X 14.5 cms and to cross as follows in the shape of three-pronged fork. With vertical legs of 1.5 cms and a top horizontal of 2 cms broad. As follows fix this three-pronged fork, while referring to you with the second diagram on the page using three screws.
Once these four stages carried out. Please make as follows notches in the reinforcement of the battery in order to let pass the drawers. These notches will be of 1.5 cms broad and of 5 cms top starting from the stages of the battery.
When the notches are made. You do not have any more but to produce drawers to put at the bottom of each cage in order to facilitate the cleaning of these last. You will then fix then on the frontage of the battery like on these sides netting. Using pilot wheels and of iron wire to fix at the reinforcement of the cage. Once these last stages carried out. Your battery is ready with the breeding and this with lower cost.